Most of the settings of interest to an administrator are on Adapt It's Administrator menu. This menu is normally hidden from view. It can only be shown and accessed under password control. To make the Administrator menu visible you can select the Show Administrator Menu menu item from the View menu. To initially show the Administrator menu you will need to use the default password. Once you have access to the Administrator menu you can assign a personalized password for accessing the Administrator menu, however, the default password will always work to make the Administrator menu visible at any time.
The Adapt It team highly recommends that you take advantage of the Administrator menu's configuration options, since a careful setup can make it easier for a user to do productive work within Adapt It, and much easier to collaborate with a dedicated Scripture editor such as Paratext or Bibledit .
The translation program administrator features that Adapt It version 6 has are shown in this brief outline (click on links to go to the detail steps below):
Adapt It Projects versus Paratext or Bibledit Projects .
Automatically exchange Scripture files with Paratext or Bibledit - no more exporting and copying of files manually back and forth between Adapt It and Paratext or Bibledit!
Protect Paratext’s or Bibledit’s advanced drafts from being overwritten by older draft versions when updating the old drafts and the Adapt It knowledge base.
Set up a User Workflow Profile . You can now easily customize the way your users work with Adapt It by hiding menu items, tool bar buttons, and other interface items that are not needed for a given user. Adapt It provides levels of pre-configured user workflow profiles including: Novice, Experienced, or Skilled. You can also customize your own profile. Later you can just as easily unhide certain items as a user's skill level or role in the program calls for it.
Preassign locations for the various kinds of inputs and outputs -- no more getting lost in a computer's file system or saving files where they may never be found again!
Moving or copying files and folders .
Setting up an Administrator password .
Special considerations for using Adapt It under the Balsa system .
Set up a custom work folder (Optional).
Guidelines for training Adapt It users .
Setting Up Adapt It Desktop Launchers For Specific Work Scenarios .
We hope you enjoy using Adapt It and find it to be a useful and effective tool in your work and ministry!
![]() The Adapt It Team
The Adapt It Team
Some of the discussion about establishing connections between Adapt It and Paratext or Bibledit projects may be confusing if you are not aware of the different approaches these translation applications have to translation projects. Both Paratext and Bibledit consider a project to involve the creation of a translation in only one language. These applications may bring in translation resources such as Bible translations in other languages to assist the human translator. Each translation resource is stored in a single Paratext or Bibledit project.
Since Adapt It partially automates the translation process it involves the use of two languages in its projects:
A source language text which has been prepared before the start of the project.
A target language text which is developed as the output of the adaptation process.
Because Adapt It works with a minimum of two languages, collaboration requires the development of at least two projects in Paratext or Bibledit for each Adapt It project:
1. A source project in Paratext or Bibledit that already has text that can serve as the Adapt It source document.
2. A target project also in Paratext or Bibledit that is initially empty so that it can receive the target language text produced by Adapt It.
In addition, since Adapt It has the ability to create free translations, you may want to create another empty Paratext or Bibledit project to receive the free translations.
Collaboration between Adapt It and either Paratext or Bibledit means that the strengths of both translation applications are available to the translator in a relatively seamless process. When collaborating with Paratext or Bibledit, Adapt It creates and maintains its own projects in project folders - just as it did in previous versions of Adapt It. But when collaborating with Paratext or Bibledit, Adapt It automatically handles the transfer of source texts from Paratext or Bibledit to Adapt It's own project and it automatically handles the transfer of adapted/target texts (and free translations) back to the appropriate Paratext or Bibledit projects, where they can be revised, checked and polished in Paratext or Bibledit.
One other difference between Adapt It and the other programs is that Adapt It is stores documents at the chapter or book level. Paratext stores documents at the book level only. Bibledit stores documents at the chapter level only. The collaboration process knows about this difference and is able to accommodate it. However, it does have implication for the planning process by the administrator. You need to plan ahead in determining what books are to be translated and the approach you want to use. The AI team recommends that you use a chapter by chapter approach consistently. Therefore working in collaboration uses the chapter by chapter approach by default. This means that, although Adapt It uses smaller units in its own AI project, collaboration mode keeps the Paratext texts in book units, and the Bibledit texts in their chapter units.
Thus any organization method is supported. However, once you decide to use a book or a chapter as an adaptation unit you should keep using that unit throughout the work in a project. For a given book, you should not do adaptation work part of the time using the whole book approach and part of the time using a chapter by chapter approach.
Note: On some low power computers with relatively slow processors, we recommend that you use the chapter by chapter approach, since working in whole book mode for collaboration may operate more slowly, especially for document loading and saving.
If you use Paratext 7, Paratext 8, Paratext 9, or Bibledit, you can now set up Adapt It to collaborate directly with Paratext or Bibledit . Here are the steps:
If you have previously set up Adapt It to collaborate with Paratext 7, and have upgraded to Paratext 8 or Paratext 9, you should do the following before you attempt to continue collaboration work between Adapt It and Paratext:
First be sure that you have migrated all the Paratext projects used in collaboration work from Paratext 7 to Paratext 8. You must use the procedures within Paratext 8 to migrate the Paratext 7 projects that Adapt It was using previously during collaboration work - migrating those projects from the Paratext 7 installation over to the new Paratext 8 installation. These Paratext projects include the Paratext project that was being used for obtaining Adapt It's "source texts", the Paratext project that was being used for receiving Adapt It's "target texts" - as well as any Paratext project that was being used for receiving "free translations" generated within Adapt It.
You should then make sure that you have upgraded Adapt It to version 6.8.2 or newer. Version 6.8.2 fixes a few potential collaboration problems since version 6.8.0. Versions of Adapt It earlier than 6.8.0 will NOT collaborate with Paratext 8.
If you do these two things, Adapt It 6.8.2 or newer should be able to continue collaborating with the same Paratext language projects that have been migrated to Paratext 8 - without needing to change any collaboration settings within Adapt It. If you encounter any problems after upgrading from Paratext 7 to Paratext 8, and after migrating the user's Paratext language projects to Paratext 8, you may need to display the Administrator menu within Adapt It, choose "Setup or Remove Collaboration..." and follow the steps in that dialog to setup collaboration between Adapt It and the version of Paratext that is being actively used.
IMPORTANT: For Adapt It to collaborate with Paratext, you need to install version 7.4 or newer of Paratext and version 6.8.2 or newer of Adapt It. (Older versions of Adapt It from 6.2.1 and onwards supported collaboration to some extent, but for best results please use the most recent version of Adapt It available at http://adapt-it.org. If your version of Adapt It is not at least 6.6.4 or newer, you will need to download and install it. If you have upgraded to Paratext 8, or Paratext 9, you will need to upgrade to Adapt It version 6.8.2 or newer to continue collaboration work with Paratext 8/9 projects.
BEFORE you set up Adapt It to collaborate with Paratext, you should ensure that Paratext has at least TWO projects set up -- one project for obtaining source texts, and a different project to receive the translation drafts produced by Adapt It. (You may also want to have a third project set up within Paratext for storing Free translations.) The source project needs to have completed texts, either imported from a source or completed in Paratext. It is best if you include all texts that that are to be translated in the project. However, you can add books piecemeal to Paratext as the work progresses, and Adapt It will accommodate that happily.
The project(s) that are to receive the translation draft (and free translation, if desired) need to be established as well. These projects need to contain "empty " books which include the chapter and verse USFM markers. There needs to be an empty book to correspond to each of the books in the source project. The USFM markers are necessary for Adapt It to properly place the draft translations.
|
|
|
The Paratext "Project Properties and Settings" dialog |
As you create the projects it is important to ensure that
the Language field is set correctly in Paratext's
Project Properties and Settings dialog for each
Paratext project in the Adapt It collaboration. Press the
Edit/View... or the New... button
to enter a unique language name for each project. Paratext
provides you with a small set of defined languages and if one of
your languages is not in the defined list, you can establish a new
one by pressing the New... button. Therefore, if
the collaboration project has the objective of
translating Swahili texts to English, the
"source" project's Language field should
be set to Swahili. In the same way, the "target
texts" project's Language field should be set
to English. You may need to
establish Swahili as a "new" language; however, English is
a Paratext predefined language. Free translation projects may
be in the same language as the target project or in a different
language for reading by a consultant.
The next step is to set up the collaboration in Adapt It. This process takes place using the Administrator menu.
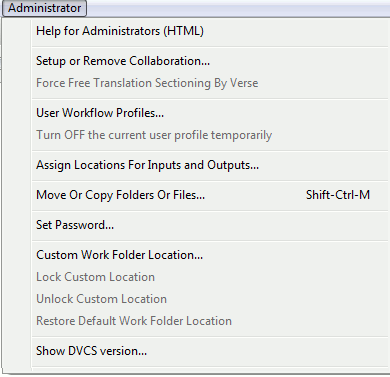
When you select "Setup or Remove Collaboration..." the following dialog appears:
|
|
|
The "Set Up or Remove Collaboration" dialog |
You should follow the 4 numbered steps as shown on this
dialog:
Select an existing Adapt It project from the drop-down list that you want to use for collaboration. If the Adapt It project does not yet exist you can click on the "Create New Adapt It Project" button to create an empty Adapt It project for Adapt It to use in the collaboration process. An Adapt It project is needed to keep its adaptation documents during collaboration. If you select an Adapt It project that has previously been configured for collaboration, its collaboration settings will appear in the data fields in Step 3.
The choices for Scripture Editor will depend on which programs are installed on your computer, and whether you previously had collaboration working on your computer. The possible editors that Adapt It can collaborate with are Paratext 7, Paratext 8, Paratext 9, and Bibledit. If you computer has multiple versions of Paratext (7,8, or 9) installed with valid language projects those versions of Paratext will be enabled as valid choices under Scripture Editor. If your computer has Bibledit installed the "Bibledit" choice will be available. If only one editor is installed and so only one choice will be available. Verify that the Paratext or Bibledit projects that you want Adapt It to collaborate with have already been created within Paratext or Bibledit. A minimum of at least two projects are required: One project for obtaining source texts for adaptation work in Adapt It; and a different project to receive the adapted texts produced by Adapt It. If the user wants to create a "free translation" in addition to an adaptation, you need to have a third project set up to receive free translations.
The Paratext/Bibledit projects need to have ALL of the books that are to be adapted in the overall project. This means that you need to import all available source text books into the Paratext/Bibledit source text project. In the project that is to receive adapted texts, you should create the same set of books as in the source project. When creating books in the projects for receiving translated drafts or free translations, they should be created empty, but with chapter and verse numbers (the default).
Each line in the list in step 2 displays a single Paratext or Bibledit project. For Paratext 7, 8, or 9, the list lines have up to four parts separated by colon characters (:). The first part is the Paratext "Short Name". The second part is the Paratext "Full Name" for that project. The third part is the "Language" name. The fourth part (if it has been defined within Paratext) is the language code for that project. Bibledit projects have a single part which is generally the same name as the Bibledit project. Important: If you do not see the expected projects for the editor button selected, you should STOP at this point in the Adapt It setup. Close the Setup Collaboration dialog (without saving any changes), and go back to Paratext or Bibledit to do the necessary setup. You will not be able to complete the Adapt It setup using this dialog until the necessary Paratext 7, 8, 9, or Bibledit projects exist.
Once you have ensured that the necessary projects have been
created, you need to choose at least two of those projects
using the "Select ... Project from List" buttons
shown in step 3. Click on the "Select Source Project from List"
button and select the project from which source texts will be
obtained during collaboration. Wait a few seconds for Adapt It to analyze the
books available in that project and report on what it finds. The
status bar at the bottom of the Adapt It screen shows the progress
as Adapt It analyzes the books. Then click on the "Select
Target Project from List" button and select a
different project which is to receive translation drafts during
collaboration. Again, wait for Adapt It to analyze and report on the
books available in that project. If you have set up a third project
to receive free translations, use the third button "Select Free
Translation Project from List" to select that project. The
projects selected will appear in the dialog to the left of the
"Select ... Project from List" buttons. If you
accidentally selected a project for receiving free translations, you
can clear that project's selection using the "No Free
Translation" button.
3a. The "Get by Chapter
Only" option is the recommended method of retrieving text
during collaboration. However, when doing adaptations between two
closely related dialects that involve few changes between the source
text and target text, a more efficient work flow may result by
selecting "Get by Whole Book". Note: The loading and
saving of documents in "Whole Book" collaboration will
take noticeably more time, especially on slower computers and for
books that contain many chapters such as Matthew, Luke, Acts,
Psalms, etc.
Click on the "Accept this setup and prepare for another" button to save this collaboration scenario in the Adapt It' project configuration file. Adapt It will verify that the setup configuration has been saved. The data fields of the dialog now become empty in case you want to set up another collaboration projects while working in this dialog. If you have selected an Adapt It project in Step 1 that has previously been configured for collaboration its settings will appear in the data fields of Step 3. If for some reason you want to remove the collaboration settings for the selected Adapt It project, you can do so by clicking the "Remove this AI Project from Collaboration" button.
When you have finished configuring collaboration setups, click on the Close button to close the "Setup Collaboration" dialog. The Start Working Wizard will appear. You can now test how the application will work for the user. From the wizard's "Select a Project" page, select a project that you have just configured for collaboration.
You will then see what the user sees when opening that project - a dialog that looks like this:
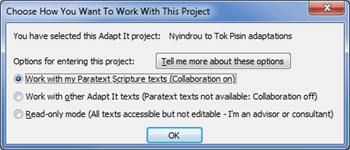
The user has three options for entering a project that
you have configured for collaboration. The three options correspond
to the three radio buttons in the above dialog. The first two buttons
are designed to allow the user to decide whether he wants to work
on texts in that project with collaboration on or off. When he
elects to "Work with my Paratext Scripture texts
(Collaboration on)" and clicks the OK button, the
wizard will close and he will see the main book/chapter
selection dialog (see below). If he elects to "Work
with other Adapt It texts (Paratext texts not available:
Collaboration off)" the wizard will continue on to the "Select
a Document" page of the wizard, where he can then select any
non-collaboration documents that are available for adaptation
work. With collaboration turned off the user will work
with Adapt It, adapting non-collaboration texts in the same
way that Adapt It worked before its collaboration features were
added in version 6. Thus, a single Adapt It project may
contain documents that are created both when collaboration is
on, and when collaboration is turned off. When collaboration is
turned on, the user never needs to interact with any documents -
he only chooses scripture books and chapters (see below). When
collaboration is turned off for the same Adapt It project, the user
will see and interact with only non-collaboration documents
using the "Select a Document" page of the wizard.
The
third option for entering a project is designed for advisors and
consultants to use. It is labeled "Read-only mode (All
texts accessible but not editable - I'm an advisor or consultant)".
When this option is selected, collaboration mode remains off and the
"Select a Document" page of the wizard appears. In this
case all documents, both collaboration documents (whose names begin
with "_Collab...") and non-collaboration documents will
appear in the list of documents, and any of them can be opened.
However, with this third option in effect, all documents opened
will be in read-only mode. This mode is designed so that an advisor
or consultant can view the user's work without risk of making any
unintended changes. When in this mode, the background of the main
Adapt It window will be pink as a reminder that read-only mode is in
effect and any changes made in that mode cannot be saved, but will be
lost when the document is closed.
When the user selects "Work with my Paratext Scripture texts (Collaboration on)", after a short pause the following collaboration dialog will appear:
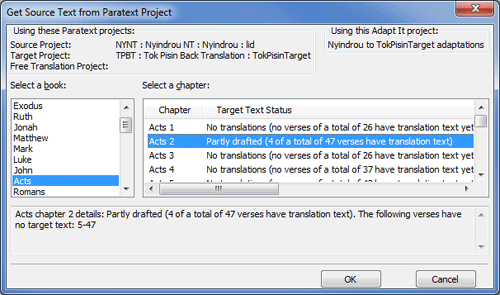
This is the main dialog that the user will see when collaboration is turned on for the given project. From this simple dialog the user can select a Scripture book and chapter for collaboration. The dialog shows a list of the scripture books available in Paratext's Source Project. It also shows the chapters for the book together with information about the status of the target text as it is currently stored in Paratext's Target Project. The user can select any Paratext book and chapter to work on. When OK is clicked, Adapt It automatically fetches the source text and any existing target text from Paratext and displays them in Adapt It's main window, ready to continue the adaptation process. When work is saved within Adapt It, Adapt It automatically transfers the saved target translation back to the appropriate Paratext project. If a Paratext project is set up for storing free translations, those are also saved in the appropriate Paratext project.
In the past working chapter by chapter in Adapt It and then moving the results to Paratext involved a lot of manual work -- copying and joining chapter files together into whole books and copying them back and forth between Adapt It and Paratext. Not any more! Adapt It knows how to handle the consolidation of books into chapters and how to break books into chapters. All the details and organization of files are processed behind the scenes and invisible to the user. During collaboration work the user never needs to navigate around in the computer's file system and never needs to find or copy or move files.
Note: When Adapt It works in collaboration with Paratext, it not only transfers data between Adapt It and the selected Paratext projects -- it also maintains its own collaboration project in the computer's "Adapt It Unicode Work" folder (or Adapt It Work folder for the non-Unicode version). If the Adapt It project has already been established and work has already been done in the two languages, the collaboration project can take advantage of the previously developed project knowledge base. The collaboration project continues to develop the knowledge base. You should be aware however that you can not continue to work on previously created documents while Adapt It is in collaboration mode. Collaboration mode must turned off to work in standard Adapt It documents.
IMPORTANT: If you used Adapt It version 6.0.x or 6.1.x previously, please note that as of version 6.2.1, collaboration with Bibledit can now be setup for individual Adapt It projects, and it is now the user's decision as to whether to turn collaboration on or off for a given Adapt It project. Therefore, if you have previously used version 6.0.x or 6.1.x of Adapt It for collaboration with Bibledit, your collaboration settings will be preserved in upgrading to 6.2.1, but please review the section below carefully for differences in how collaboration is now setup and used.
For Adapt It to collaborate with Bibledit, you need to install version 6.2.1 or newer of Adapt It and version 4.3 or newer of Bibledit-gtk. The current version of Adapt It packaged in the SIL repositories can handle collaboration, and the current version of Bibledit that is in the Ubuntu repositories can also handle collaboration with Adapt It. Do the following steps:
a. Start up Synaptic Package Manager. It should be located in the System > Administration menu (If it is not there or you are using Unity, which doesn't install it by default, you can find the Synaptic Package Manager by clicking on "Ubuntu Software Center". In the Ubuntu Software Center's Search box type "Synaptic", then click on the "Synaptic Package Manager" item when it appears and click on "Install").
b. In the Synaptic Package Manager application click on the Settings > Repositories. Click on the "Other Software" tab. Examine the list of software repositories. If there is not already a line that contains a reference to http://packages.sil.org/ubuntu ..., then click on the "Add..." button at the bottom. Then enter one of the following lines depending on which distribution of Ubuntu Linux is installed on your machine:
deb http://packages.sil.org/ubuntu precise main
deb
http://packages.sil.org/ubuntu trusty main
deb
http://packages.sil.org/ubuntu utopic main
deb
http://packages.sil.org/ubuntu vivid main
deb
http://packages.sil.org/ubuntu wily main
deb
http://packages.sil.org/ubuntu xenial main
deb
http://packages.sil.org/ubuntu yakkety main
c. Close the Software Sources, and return to the Synaptic Package Manager, click on "Reload" to insure you have the latest information from the repositories. If you get an error, check that you have entered the correct line into your Other Software (step b above).
d. Click on the "Search" button and type adaptit in the search box. When the adaptit packages appear, look at the "Installed Version" and "Latest Version" columns. Ensure that the version listed for adaptit is at least 6.2.1, but preferably 6.5.3 or later. If the "Latest Version" (if no version of adaptit is at least 6.2.1 make sure you have set up the http://packages.sil.org/ubuntu line correctly in the Synaptic Package Manager's Software Sources setup in step b above). If no version is listed in the "Installed Version", or if the "Latest Version" is newer than the "Installed Version" listed you should mark the adaptit is entries for installation or upgrade. To mark the adaptit and adaptit-docs packages, right click on them and select "Mark for Installation" or "Mark for Upgrade" from the popup menu. Select the "Mark" button in the warning dialog. Then click on the "Apply" button at the top of the Synaptic Package Manager application, and click on the "Apply" button on the Summary dialog. Close Synaptic Package Manager after it completes the installation of Adapt It.
e. In the Synaptic Package Manager application click on the "Search" button and type bibledit-gtk in the search box. When the bibledit-gtk and bibledit-gtk-data packages appear, look at the "Installed Version" and "Latest Version" columns. Ensure that the version listed for bibledit is at least 4.3. If no version is listed in the "Installed Version", or if the "Latest Version" is newer than the "Installed Version" listed you should mark the bibledit-gtk and bibledit-gtk-data entries for installation or upgrade. To mark the bibledit-gtk and bibledit-gtk-data packages, right click on them and select "Mark for Installation" or "Mark for Upgrade" from the popup menu. Select the "Mark" button in the warning dialog. Then click on the "Apply" button at the top of the Synaptic Package Manager application, and click on the "Apply" button on the Summary dialog. Close Synaptic Package Manager after it completes the installation of bibledit-gtk.
After their installation, both Adapt It and Bibledit-Gtk should be listed in the Office menu (or can be found by searching for adaptit or bibledit on Unity's Desk Home search bar). The next step is to ensure that you have your Bibledit projects (at least two) setup within Bibledit.
BEFORE you set up Adapt It to collaborate with Bibledit, you should ensure that Bibledit has at least TWO projects set up - one project for obtaining source texts, and a different project to receive the translation drafts produced by Adapt It. You may also want to have a third project set up within Bibledit for storing Free translations . These projects should be set up, complete with books either imported or created within Bibledit BEFORE you set up Adapt It to collaborate with Bibledit. Select File > Project > New to access Bibledit's "Project properties" dialog. It looks like this:
|
|
|
The Bibledit "Project properties" dialog |
Note: You can ignore the Language setting field shown above during the setup for collaboration. If you know how to set up a customized Bibledit language name you can do so; but because of the difficulty for most users, Adapt It does not make use of the "Language" setting here in the Bibledit Project's properties dialog. Instead Adapt It will allow you to define the language names it will use for the Bibledit projects participating in the collaboration process (see below).
Important: As an administrator you should have a long term goal in mind when creating the Bibledit projects and the books for those projects. You should import into the Bibledit project used for source texts ALL books that may eventually be adapted using Adapt It. In the Bibledit project that is to receive adapted texts, you should create ALL the books that may ever be translated now at the beginning of the project. When creating books in the Bibledit projects for receiving translated drafts or free translations, they should be created empty, but with chapter and verse numbers (the Bibledit default). To do this, after you add a book, use the "+ Templates" button to get the book's chapters setup with USFM markers without any text content.
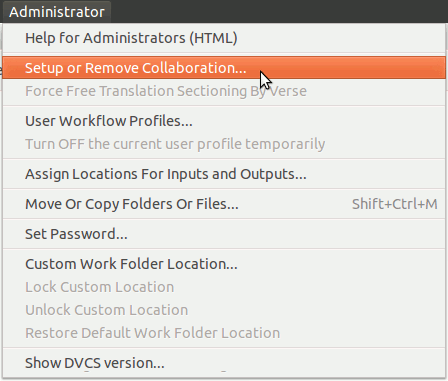
When you select "Setup Or Remove Collaboration..." the following dialog appears:
|
|
|
The "Setup Or Remove Collaboration" dialog |
You should follow the 4 numbered steps as shown on this
dialog:
Select an existing Adapt It project from the drop-down list that you want to use for collaboration. If the Adapt It project does not yet exist you can click on the "Create New Adapt It Project" button to create an empty Adapt It project for Adapt It to use in the collaboration process. An Adapt It project is needed to keep its adaptation documents during collaboration. If you select an Adapt It project that has previously been configured for collaboration, its collaboration settings will appear in the data fields in Step 3.
The choices for Scripture Editor will depend on which
programs are installed on your computer, and whether you previously
had collaboration working on your computer. If your computer has
both Paratext and Bibledit installed both the "Paratext"
and "Bibledit" choices will be available, but usually only
one choice will be available. Verify that the Bibledit or
Bibledit projects have already been created within Bibledit or
Paratext. A minimum of at least two projects
are required: One project for obtaining source texts for adaptation
work in Adapt It; and a different project to receive the adapted
texts produced by Adapt It. If the user will be creating a free
translation in addition to an adaptation, you need to have a third
project set up to receive free translations.
The
Paratext/Bibledit projects need to have ALL of the books that are to
be adapted in the overall project. This means that you
need to import all available source text books into
the Paratext/Bibledit source text project. In the project that is to
receive adapted texts, you should create the same
set of books as in the source project. When creating books in the
projects for receiving translated drafts or free translations, they
should be created empty , but with
chapter and verse numbers (the default).
Each
line in the list displays a single Paratext or Bibledit project. For
Paratext, the list lines have up to four parts separated by colon
characters (:). The first part is the Paratext "Short Name".
The second part is the Paratext "Full Name" for that
project. The third part is the "Language" name. The fourth
part (if it has been defined within Paratext) is the language
code for that project. Bibledit projects have a single part which is
generally the same name as the Bibledit project. Important: If
you do not see the projects listed that your user will need to use
in collaboration, you should STOP at this point in the Adapt It
setup. Cancel from the Setup Collaboration dialog and do the
necessary setup of the Paratext or Bibledit projects first. You will
not be able to complete the Adapt It setup using this dialog until
the necessary Paratext or Bibledit projects already exist.
Once you have ensured that the necessary projects have been
created, you need to select at least two of those projects
using the "Select ... Project from List" buttons
shown in step 3. Click on the "Select Source Project from List"
button and select the project from which source texts will be
obtained during collaboration. Then click on the "Select Target
Project from List" button and select a different project
which is to receive translation drafts during collaboration. If you
have set up a third project to receive free translations, use the
third button "Select Free Translation Project from List"
to select that project. The projects selected will appear in the
dialog to the left of the "Select ... Project from List"
buttons. If you accidentally selected a project for receiving free
translations, you can clear that project's selection using the "No
Free Translation" button.
3a. The "Get by
Chapter Only" option is the recommended method of retrieving
text during collaboration. However, when doing adaptations between
two closely related dialects that involve few changes between the
source text and target text, a more efficient work flow may result
by selecting "Get by Whole Book". Note: The loading and
saving of documents in "Whole Book" collaboration will
take noticeably more time, especially on slower computers and for
books that contain many chapters such as Matthew, Luke, Acts,
Psalms, etc.
Click on the "Accept this setup and prepare for another" button to save this collaboration scenario in the Adapt It' project configuration file. Adapt It will verify that the setup configuration has been saved. The data fields of the dialog now become empty in case you want to set up another collaboration projects while working in this dialog. If you have selected an Adapt It project in Step 1 that has previously been configured for collaboration its settings will appear in the data fields of Step 3. If for some reason you want to remove the collaboration settings for the selected Adapt It project, you can do so by clicking the "Remove this AI Project from Collaboration" button.
When have finished configuring collaboration setups, click on the Close button to close the "Setup Collaboration" dialog. The Start Working Wizard will appear. You can now test how the application will work for the user. From the wizard's "Select a Project" page, select a project that you have just configured for collaboration.
You will then see what the user sees when opening that project - a dialog that looks like this:
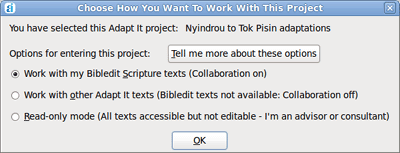
The user has three options for entering a project that you
have configured for collaboration. The three options correspond to
the three radio buttons in the above dialog. The first two buttons
are designed to allow the user to decide whether he wants to work
on texts in that project with collaboration on or off. When he
elects to "Work with my Bibledit Scripture texts
(Collaboration on)" and clicks the OK button, the
wizard will close and he will see the main book/chapter
selection dialog (see below). If he elects to "Work
with other Adapt It texts (Bibledit texts not available:
Collaboration off)" the wizard will continue on to the "Select
a Document" page of the wizard, where he can then select any
non-collaboration documents that are available for adaptation
work. With collaboration turned off the user will work
with Adapt It, adapting non-collaboration texts in the same
way that Adapt It worked before its collaboration features were
added in version 6. Thus, a single Adapt It project may
contain documents that are created both when collaboration is
on, and when collaboration is turned off. When collaboration is
turned on, the user never needs to interact with any documents -
he only chooses scripture books and chapters (see below). When
collaboration is turned off for the same Adapt It project, the user
will see and interact with only non-collaboration documents
using the "Select a Document" page of the wizard.
The
third option for entering a project is designed for advisors and
consultants to use. It is labeled "Read-only mode (All
texts accessible but not editable - I'm an advisor or consultant)".
When this option is selected, collaboration mode remains off and the
"Select a Document" page of the wizard appears. In this
case all documents, both collaboration documents (whose names begin
with "_Collab...") and non-collaboration documents will
appear in the list of documents, and any of them can be opened.
However, with this third option in effect, all documents opened
will be in read-only mode. This mode is designed so that an advisor
or consultant can view the user's work without risk of making any
unintended changes. When in this mode, the background of the main
Adapt It window will be pink as a reminder that read-only mode is in
effect and any changes made in that mode cannot be saved, but will be
lost when the document is closed.
When the user selects "Work with my Bibledit Scripture texts (Collaboration on)", after a short pause the following collaboration dialog will appear:
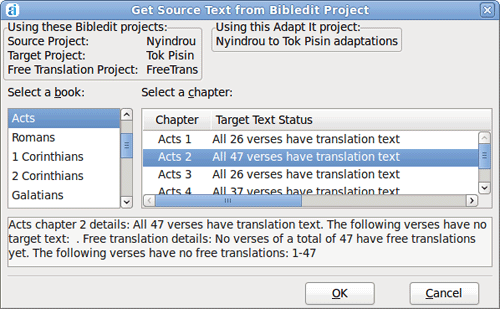
This is the main dialog that the user will see when collaboration is turned on for the given project. From this simple dialog the user can select a Scripture book and chapter for collaboration. The dialog shows a list of the scripture books available in Bibledit's Source Project. It also shows the chapters for the book together with information about the status of the target text as it is currently stored in Bibledit's Target Project. The user can select any Bibledit book and chapter to work on. When OK is clicked, Adapt It automatically fetches the source text and any existing target text from Bibledit and displays them in Adapt It's main window, ready to continue the adaptation process. When work is saved within Adapt It, Adapt It automatically transfers the saved target translation back to the appropriate Bibledit project. If a Bibledit project is set up for storing free translations, those are also saved in the appropriate Bibledit project.
In the past working chapter by chapter in Adapt It and then moving the results to Bibledit involved a lot of manual work -- copying and joining chapter files together into whole books and copying them back and forth between Adapt It and Bibledit. Not any more! Adapt It knows how to handle the consolidation of books into chapters and how to break books into chapters. All the details and organization of files are processed behind the scenes and invisible to the user. During collaboration work the user never needs to navigate around in the computer's file system and never needs to find or copy or move files.
Note: When Adapt It works in collaboration with Bibledit, it not only transfers data between Adapt It and the selected Bibledit projects -- it also maintains its own collaboration project in the computer's "Adapt It Unicode Work" folder (or Adapt It Work folder for the non-Unicode version). If the Adapt It project has already been established and work has already been done in the two languages, the collaboration project can take advantage of the previously developed project knowledge base. The collaboration project continues to develop the knowledge base. You should be aware however that you can not continue to work on previously created documents while Adapt It is in collaboration mode. Collaboration mode must turned off to work in standard Adapt It documents.
Adapt It now has a new collaboration document data transfer protection feature. Teams who use Adapt It to collaborate with Paratext or Bibledit to translate drafts of Scripture books eventually stop adapting/drafting those books within Adapt It, and just continue the revision of those Scripture books (and chapters) in Paratext or Bibledit. However, once such books have reached an advanced/polished state (and perhaps consultant checked), it can be very beneficial to open the old drafts of those books again in Adapt It and update the old drafts in the Adapt It project to include the revisions that were done to those documents in Paratext/Bibledit. By doing so, those revisions and updates will be stored/updated in Adapt It's knowledge base for that project, making the knowledge base is more up-to-date for the drafting of subsequent Scripture books.
When the Adapt It documents are updated within Adapt It for documents that should not be getting any further changes within the Paratext or Bibledit project, the team will want to save the changes in the Adapt It project only, and avoid the transfer of those changes to Paratext or Bibledit - since such transfers might inadvertently bring possible editing errors or old renderings over into the polished documents residing in the Paratext/Bibledit project files. Adapt It's new collaboration document data transfer protection feature allows an administrator/user to block such data transfers to Paratext/Bibledit for specific books and chapters - effectively "protecting" them in their current state within the Paratext/Bibledit project.
A typical scenario for the use of this new feature in a collaboration project between Adapt It and Paratext might proceed as follows (Steps 1, 2 and 3 below are described in detail in the Paratext setup steps above):
1. The team administrator previously set up two Paratext projects: Language S, and Language T. Language S is a Paratext project that contains good quality Source texts for the books that will be adapted into Language T. The Language T project is also set up within Paratext and initially has all the books to be translated, but they are created within Paratext as empty books - containing only chapter and verse numbers.
2. The team administrator runs Adapt It and sets up a collaboration project within Adapt It using Adapt It's Administrator menu item "Setup Or Remove Collaboration..." which provides a dialog that the administrator uses for creating a new Adapt It collaboration project (i.e., Language S to Language T adaptations), and designating which Paratext project is to be used as Adapt It's source text (in this case the Paratext 'Language S' project), and which Paratext project is to be used to receive Adapt It's adaptations/translations/target text (in this case the 'Language T' Paratext project that was created as "empty" - initially containing just chapter and verse numbers). The administrator keeps the default (and recommended) setting to collaborate by "Chapter Only".
3. A team translator then runs Adapt It and opens its "Language S to Language T adaptations" collaboration project, and ensures that the "Work with my Paratext Scripture text (Collaboration on)" button is selected (if not pre-selected). The team has decided this translator should start with the book of Mark, so the translator selects the book of Mark (if not already pre-selected) from the "Get Source Text from Paratext Project" dialog. The translators selects the Chapter to work on (if not pre-selected from previous work session). Adapt It retrieves the chapter from the Paratext project's 'Language S' project, and displays it as source text within the Adapt It main window. The translator (who has learned to use Adapt It, being trained by the administrator), then adapts the source text into the target text, benefiting from the increasing assistance of Adapt It's knowledge base for the "Language S to Language T adaptations" project. Each time the translators saves the document within Adapt It, Adapt It saves the adaptation document locally within the Adapt It collaboration project, AND Adapt It transfers the newly created 'Language T' target text over to the Paratext 'Language T' project.
4. The translator reviews and revises the draft of the chapter one or more times from within Adapt It, and continues the drafting process opening another chapter of Mark, and adapting it within Adapt It - until all chapters of Mark have been drafted within Adapt It. In this 'drafting stage' it is best for the translator to use Adapt It solely while drafting and doing the initial revision of the chapters, and refrain from doing any drafting from within Paratext until the initial drafting and early revision work has been done within Adapt It for all chapters of the book.
5. At a certain point the translator and administrator decide that future revision work for the book of Mark should all be done within Paratext to bring the draft on to a polished or publishable stage. It is at this point that Adapt It's new data transfer protections feature can come into play. The administrator makes the Administrator menu visible within Adapt It and selects the "Manage Data Transfer Protections to Paratext or Bibledit..." item on the Administrator menu. The following dialog appears:
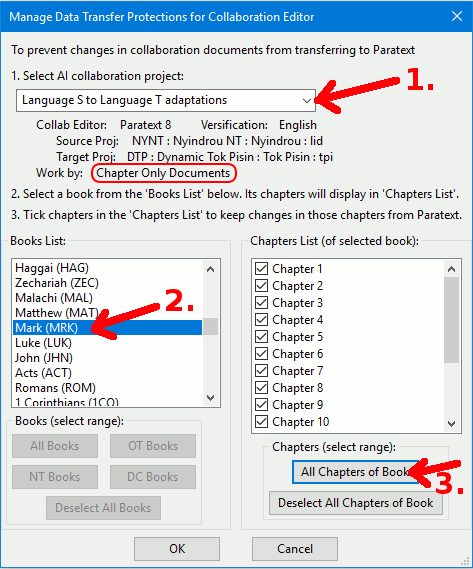
In the dialog the administrator follows the 3 numbered steps:
(1) Selects an AI collaboration project from the drop-down list - in our example case it would be the 'Language S to Language T adaptations' project. The possible books appear in the 'Books' List.
(2) The administrator selects the book of Mark from the 'Books List' - and the dialog displays the 16 chapters of Mark in the 'Chapters List' with empty check boxes next to each chapter.
(3) The administrator then clicks on the "All Chapters of Book" button to put ticks in the check boxes of all 16 chapters.
Finally the administrator clicks on OK to save the 'protection' settings for all chapters of the book of Mark. The draft that exists in Paratext is now 'protected' in the sense that any changes that get made back in the chapter documents of Mark within Adapt It will no longer be transferred to Paratext.
Some teams set up a collaboration project in Adapt It to collaborate with Paratext in ‘Whole Book’ mode rather than in the default ‘Chapter Only’ mode. In such cases the "Manage Data Transfer Protections to Paratext or Bibledit" dialog appears like this:
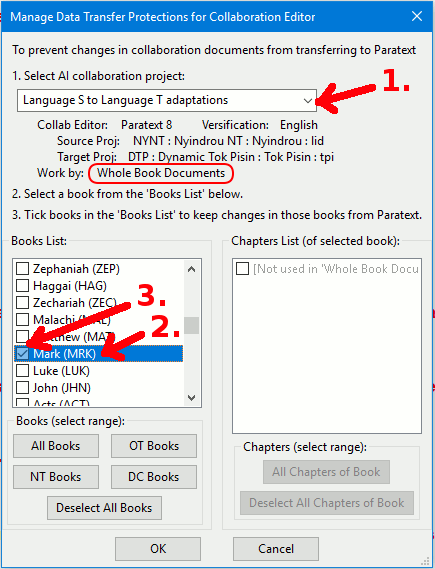
In this version of the dialog the administrator again follows the 3 numbered steps:
(1) Selects an AI collaboration project from the drop-down list - in our example case it would be the 'Language S to Language T adaptations' project. The possible books appear in the 'Books' List.
(2) The administrator selects the book of Mark from the 'Books List'. The ‘Chapters List’ is disabled since in ‘Whole Book’ mode, collaboration only gets whole books from Paratext.
(3) The administrator then clicks on the check box for the book he wants to “protect” in Paratext, or alternatively selects one of the range buttons below the ‘Books List’ to select a range of books.
Finally the administrator clicks on OK to save the 'protection' settings for the whole book(s) selected. The draft that exists in Paratext is now 'protected' in the sense that any changes that get made back in the book of Mark within Adapt It will no longer be transferred to Paratext.
6. The team continues the revision process of the book of Mark within Paratext until the book has gone through all the revisions to an advanced/polished state. That polished state might include consultant checking and even publishing. Up to this point no further work has been done on the old drafts that still exist in the Adapt It project.
7. With all the chapters of Mark 'protected', and after the book of Mark has been revised to an advanced state in Paratext, the administrator asks the translator to open the old Adapt It 'Language S to Language T adaptations' project in one desktop window, and Paratext in another window with the Language T Paratext project displaying within Paratext, so that the translator can compare the polished version in Paratext’s Language T project with the ‘target’ Language T in the old drafts in the Adapt It project. The administrator asks the translator to open each chapter (or book for whole book mode) of Mark in Adapt It and compare the old drafts with the more polished version in Paratext - and make changes in the Adapt It drafts to make them read as much the same as possible as the polished version. The purpose of this updating of the draft in Adapt It is to update Adapt It's knowledge base for that project so that it contains the updated translations /adaptations that were added in Paratext after work ceased on the draft in Adapt It. Since the book of Mark has been marked as "protected from transferring changes to Paratext" the updating changes will only be saved in the local Adapt It project, and not transferred to Paratext - thus "protecting" the advanced Paratext draft from unintended changes as the translator saves the updates in the chapter documents of Mark being saved within the Adapt It project. This extra updating work on the part of the translator will pay off big-time since all the revisions and updates that were done for the book of Mark in Paratext will be brought back into Adapt It’s knowledge base and be immediately available for the next book that is adapted/drafted in that Adapt It collaboration project.
8. A translation team might follow this process for each book translated, so that each collaboration book in turn can be drafted in Adapt It, the polishing work done exclusively in Paratext or Bibledit - the administrator having used this new feature to "protect" Paratext/Bibledit from any old drafts being transferred or overwriting the advanced drafts. The translator, by going back to the old Adapt It drafts and updating those with the more polished renderings, adds the updates to the Adapt It knowledge base, so that the knowledge base provides higher quality translation equivalents when adapting/drafting each new book.
As described above the new feature is available to administrators for ‘bulk’ setting of books/chapters through Manage Data Transfer Protections for Collaboration Editor dialog (from the Administrator menu). This protection feature is also available in a more restricted form to non-administrator users via two new menu items in Adapt It' Advanced menu:
Prevent Paratext/Bibledit from getting changes to this
document
Allow Paratext/Bibledit to get changes to this
document
The above two menu items are enabled in the Advanced menu only when a collaboration project document is opened within Adapt It. With these menu items a user can tell Adapt It to "Prevent..." or "Allow...." changes made in the document transferring from/to Paratext/Bibledit when Adapt It saves the document. As with the bulk dialog (available from the Administrator menu), the protection status for the document is saved and remains in that protected state unless it is explicitly changed - either by using one of the two Advanced menu items or by the administrator in the bulk change dialog from the Administrator menu. The two new Advanced menu items are limited, because the user can only change the protection status of the open collaboration document, and cannot change the protection status for all chapters of a book (or whole book) without opening each chapter (or book) and invoking one of the above Advanced menu choices on the open document.
Adapt It has many menu items and features to choose from. Such choices may be bewildering to a new user or inexperienced user. Adapt It now allows an administrator to control which choices appear in the program's interface, and which others remain hidden until such time as they may be needed. To activate a user workflow profile, make the Administrator menu visible , then select User Workflow Profiles... menu item. The following dialog appears:
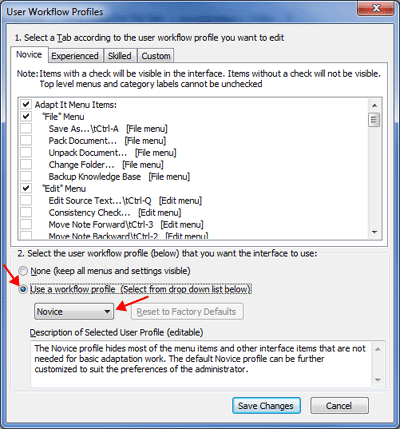
This dialog organizes Adapt It's menu selections, Preferences tabs, Mode bar items, and Tool bar items into four lists or "profiles" that correspond to the four tabs at the top of the dialog. Those tabs or profiles are labeled "Novice", "Experienced", "Skilled" and "Custom." The list in each tab all contain the same list of items, but we've pre-selected certain items on each list that we think should be visible for that profile, and un-selected those items that we think would be good to remain hidden for the given profile. The Novice profile starts with most of the listed items hidden (un-ticked). The Experienced profile makes a few more items visible in the interface (by ticking more items). The Skilled profile makes many more interface items visible (by ticking even more items).
Our suggestions are only a starting point; each profile can be further customized by you, the administrator, to your liking and according to your knowledge of the skills and needs of the user. If you select the fourth tab labeled "Custom" Adapt It will ask you if you want to initialize the selections from one of the other three profiles as a starting point -- from which you may continue to customize which interface items are to be shown (ticked), and which should be hidden (un-ticked).
The default profile setting is "None (keep all menus and settings visible)". If you want to use a workflow profile, you first need to click the radio button labeled, "Use a workflow profile (select from drop down list below)". This selection enables the drop down box located below it. Only one profile can be selected at a given time for the user. You can select the desired profile by using the drop down box which will allow you to select the Novice, Experienced, Skilled or the Custom profile. Then, to make the interface start using a selected profile click on the "Save Changes" button.
At any time you can come back to the User Workflow Profiles dialog and switch to a different profile or adjust the individual items that should be visible or hidden for a given profile, and save the changes.
If you modified the items in a given profile, and now want to revert that profile to its "factory defaults" you can do so by first selecting that profile in the drop down box, and then clicking on the "Revert to factory defaults" button. If the "Revert to factory defaults" button is disabled, it means that you have not changed the viewing status of any individual item in that profile's list.
To stop using a user profile, simply click on the "None (keep all menu and settings visible)" radio button. Adapt It will remember your settings in case you later decide to reactivate a workflow profile that you set up previously. As an administrator you might want to temporarily turn OFF the current user profile, in order to be able to access all of the interface items while examining the user's computer. This can now be done via the "Turn OFF the current user profile temporarily" menu item located in the same group as the User Wrokflow Profiles... menu item on the Administrator menu.
Some computer users find it difficult or confusing to navigate through a hierarchical file system. They often are not sure where the files are located that they need to open, or where to save or export files from Adapt It. They may get lost navigating around the file system inside a file browser. They may not really know what a file would be called that they are looking for, nor what a file should be called when saving or exporting data from Adapt It. Adapt It 6 now allows you the administrator to pre-assign locations for any and all the kinds of inputs and outputs that can be done by a user. We call this a way to "protect" a user from having to do any navigation of the file system in order to get his work done.
Adapt It now allows you the administrator, to pre-assign locations for Adapt It's inputs and outputs, and therefore protect the user from having to compose file names and from having to navigate the file system to find or save files. To activate these protections, make the Administrator menu visible, then select the Assign Locations for Inputs and Outputs... menu item.
The main dialog appears, which looks like this:
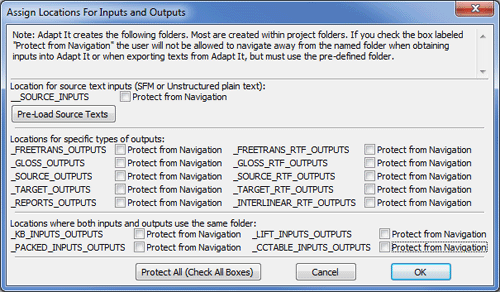
By default none of the "Protect from Navigation" check boxes are ticked. Each of the names in upper case letters and starting with one or two initial _ underscore characters, are the names of a standard set of folders that Adapt It 6 automatically creates on the user's computer. These folder locations become the default location for the types of data described by the folder's names. If you as administrator, wish to "protect" that type of data, you can simply put a tick by as many folder locations as you want. If you want to protect all the types of data that Adapt It uses or exports, simply click on the "Protect All (Check All Boxes)" button.
A setup for a fully protected user (with Paratext collaboration turned ON) would look like this:
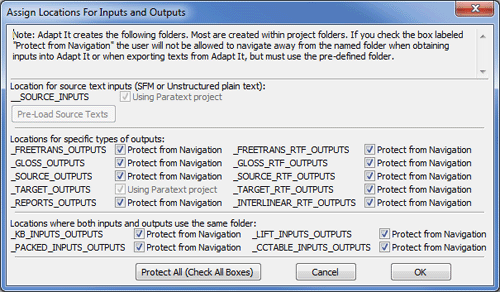
Note: When Adapt It is working in collaboration with Paratext or Bibledit, Adapt It automatically limits the location for the source text inputs it obtains for adaptation work, and it also limits the locations where translation drafts are exported -- to the Paratext or Bibledit projects that are assigned during collaboration. Therefore, if you have previously set up Adapt It to collaborate with Paratext or Bibledit, the "Protect from Navigation" check boxes to the right of __SOURCE_INPUTS and _TARGET_OUTPUTS will indicate (as shown in the dialog immediately above) that they are "Using Paratext project"; they will be automatically ticked and cannot be changed.
Again, please understand that if Adapt It is collaborating with Paratext or Bibledit, SOURCE texts can only be obtained from the Paratext or Bibledit projects, and Adapt It's TARGET texts (adapted translation drafts) are automatically transferred back to Paratext or Bibledit projects.
However, if your user will not be collaborating with Paratext or Bibledit, you should consider at least selecting the "Protect from Navigation" for the __SOURCE_INPUTS folder. When this folder is "protected" the user will only see and be able to select from a list of input texts for adaptation that are located in the __SOURCE_INPUTS folder. This can be a very helpful way to guide the user in what texts to use for adaptation. Since the user cannot obtain source text from anywhere else it is important that you, the advisor, pre-load the __SOURCE_INPUTS folder with the input texts that the user will need for his or her adaptation work. A convenient way to pre-load the __SOURCE_INPUTS folder, it to use the "Move or Copy Files Or Folders" dialog from the Administrator menu. This dialog is designed like a "smart" file browser and knows what kind of files can be used for adaptation work.
When a folder location has "Protect from Navigation" activated, Adapt It will not ask the user for a file name nor allow the user to navigate to a different folder, but will automatically assign a file name to the input or output file, and read it from or store it to the indicated location.
The following information is a technical explanation of the way Adapt It handles the file naming process. You can safely ignore this section unless you are interested in the details or in the unlikely circumstance that the file processing does not work properly. In this case, the following information can be of value in finding out what went wrong and for conveying to the Adapt It what has happened to the computer.
When navigation protection is activated for a given input/output type, Adapt It automatically assigns names to files, it composes the name based on the type of the file's contents and adds a date-time "stamp" at the end of the name, and affixes the appropriate extension. This results in some long file names, but that is of no concern to the user, because when "Protect from Navigation" is activated the user doesn't have to interact with files or file names anyway. For example, the automatically composed name for an RTF export of the target text might look something like this:
_Target_Text_45_ACT_CH02_exported_2011_07_11T14_25_53Z.rtf
and it would be located in the _TARGET_RTF_OUTPUTS folder of the Adapt It project. Because of the presence of the date-time stamp within the file name, there is never going to be a danger of files overwriting one another because all exported files will have unique, easily discernable names, and files with similar content will sort together in chronological order.
Note: The assignment of text type prefixes and/or date-time stamp suffixes on file names is not automatically done when navigation protection is OFF for a given input/output type, but it text type prefixes and date-time stamp suffixes can be used if desired at import/export time by ticking the appropriate check boxes on the dialog that appears.
We suggest that you use the Assign Locations For Inputs and Outputs dialog to help keep your user's data organized into predictable locations and its files consistently named - so that they are easily identified as to content and creation date.
When Adapt It is setup for collaboration with Paratext or Bibledit, Adapt It keeps a copy of each chapter or book file that it obtains from Paratext/Bibledit - placing the copy in the __SOURCE_INPUTS folder of the Adapt It project that is hooked up to Paratext/Bibledit during collaboration. The files that Adapt It puts in the __SOURCE_INPUTS folder are named automatically by Adapt It, and will have a _Collab_ prefix on the name. A chapter file for chapter 2 of the book of Matthew obtained from Paratext or Bibledit will be named similar to the following example:
_Collab_41_MAT_CH02.txt
If collaboration is done by whole book, a file obtained from Paratext or Bibledit will be named similar to the following example:
_Collab_41_MAT.txt
The adaptation documents that Adapt It creates - regardless of whether collaboration is ON or OFF, are still stored in the "Adaptations" folder of the Adapt It project. When collaboration is turned ON, those files are automatically named by Adapt It. The adaptation document for Matthew chapter 2 would be called:
_Collab_41_MAT_CH02.xml
and the adaptation document for the whole book of Matthew would be called:
_Collab_41_MAT.xml
in either case these xml formatted adaptation documents are always located in the Adaptations folder of the Adapt It project.
As an administrator you may have a need to move or copy files from within Adapt It. Adapt It 6 provides an "intelligent" file browser for administrative use. To get Adapt It's file browser, make the Administrator menu visible, then select the "Move Or Copy Folders Or Files..." menu item. When you do so the following dual pane dialog appears:
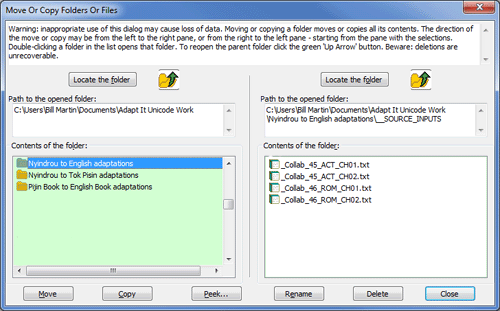
Note that generally, if your users are going to be working with Adapt It in collaboration with Paratext or Bibledit, you probably do not need to worry about moving or copying files or folders for Adapt It's use. In collaboration work the main data you will be concerned about will be the data kept in the Paratext or Bibledit data store. In collaboration mode Adapt It becomes an adaptation engine for Paratext or Bibledit, and the scripture data essentially stays within the Paratext or Bibledit projects. Adapt It automatically makes copies of the data and creates its own project for the purposes of adaptation, and Adapt It automatically transfers its target texts (translation drafts) back to Paratext or Bibledit. Hence, all data is destined to start and end within the designated Paratext/Bibledit projects.
The above "intelligent" file browser can be helpful if you do not plan to work with Adapt It in collaboration with Paratext or Bibledit. In such cases, you can use this dialog to copy potential source texts into an Adapt It project's __SOURCE_INPUTS folder.
To access the Administrator menu you first need to make the Administrator menu visible. From within Adapt It click on the "Show Administrator Menu..." item on the View menu. For the password, you can always enter the default password which is the word admin. You can also set your own password using the Administrator menu item for that purpose. The administrator password is not a highly guarded secret, but exists only to hinder inexperienced users from accessing the administrator menu and changing settings they should not be changing. If you set your own password it will be kept un-encrypted in the basic configuration file AI-BasicConfiguration.aic located in the Adapt It Unicode Work folder (or Adapt It Work folder for the non-Unicode application). If you forget your password, you can find it in the AI-BasicConfiguration.aic file, or you can simply use the default password mentioned above.
What version of Balsa are you using? If you are using Balsa based on any distribution after Lucid, you should already have Adapt It version 6.x.x. In that case you should check to see if there are any recent updates to Adapt It version 6.x.x at the packages.sil.org repository. When the Lucid version of Balsa boots up, and you log on to the Balsa User account, the opening screen looks like this:
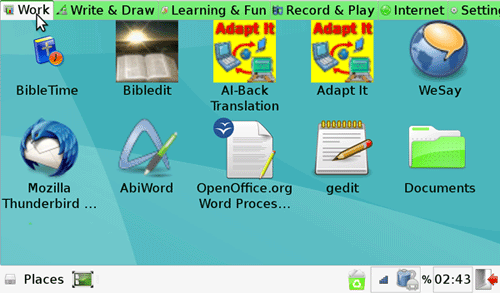
The Lucid version of Balsa as shown above has Adapt It version 5.2.4. You will need Adapt It version 6.x.x in order to take advantage of its new features designed for assisting translation program administrators, and especially working in collaboration with the Balsa Scripture editor Bibledit. The icon for Adapt It version 6 looks like this:
![]()
Adapt It
When the Balsa system boots up it shows two accounts: Advisor and Balsa User. You as an administrator need to log in first as Advisor to update Adapt It to its latest version 6 update which has many new features designed to assist you as an administrator. Then, once you have upgraded Adapt It to version 6, you should log off as Advisor and log back in as the Balsa User to complete the setup of Adapt It for that given user. Except for upgrading Adapt It to the latest version 6.x.x, all remaining setup of Adapt It should be done using the Balsa User account.
Note: any data you create while logged into the Advisor account in Balsa does NOT appear within Adapt It when Balsa is logged into the Balsa User account, and likewise any data the user creates within Adapt It under the Balsa User account does not appear when logged into the Advisor account.
The steps for doing these things are listed below:
1. Log onto the Advisor account in the Balsa
system.
2. Run the Synaptic Package Manager by
selecting it from the Applications > System menu. In the Quick
search box type the word adaptit. The "Installed" version
of adaptit listed there should be at least 6.2.1, but preferably
6.5.3 or newer. If the package manager doesn't indicate that the
recommended version is already installed, you should go ahead and
mark it for installation. If you are using an 8GB SD card form of
Balsa, you probably will want to also mark adaptit-docs for
installation (although please note that the adaptit-docs
package is about 11MB of download).
3. After you have
ensured that Adapt It version 6.2.x or newer is installed, you can
close the package manager and log off the Balsa Advisor
account. Next you will need to log on to the Balsa User
account (see below).
1. Log onto the Balsa User account.
2. On
the "Work" desktop double click on the Adapt It
icon to start up Adapt It.
3. Set up the necessary
Bibledit projects for collaboration. You need at least two Bibledit
projects: One for obtaining source texts, and one for receiving
translation (target text) drafts.
4. Access Adapt It's
Administrator menu (see how to access the
Administrator menu here).
5.
After creating the Bibledit projects (step 3), set up Adapt it to
collaborate with Bibledit (follow the Bibledit
section of this document for detailed steps).
6. Assign
locations for inputs and outputs using the dialog for that purpose.
It is recommended that you tick all of the "Protect from
Navigation" check boxes. See this
section for details.
If your user(s) will be using Balsa for one type of collaboration project you might consider setting up dedicated launcher(s).
For most users you should just allow Adapt It to create and maintain its default "Adapt It Unicode Work" folder (or "Adapt It Work" for the non-Unicode version) in the default location. For Windows systems, Adapt It will by default create this folder in the user's "Documents" (or "My Documents") folder. For Linux systems this work folder will be created in the /home/<user> folder. On Mac systems this folder will be created in the /Users/<user> folder.
In some cases you may want Adapt It to use a custom work folder in a non-default location -- such as on a different disk partition, or in a different folder than the default location. You can use the Administrator menu's "Custom Work Folder..." item to assign the location where Adapt It will establish its work folder. When you select "Custom Work Folder", Adapt It displays a standard dialog in which you can navigate to the location where you want Adapt It to establish its work folder.
Adapt It will remember any custom work folder location that you specify -- until such time as you, the administrator specify a different location or choose "Restore Default Work Folder Location" from the Administrator menu. If you establish a custom work folder location Adapt It will offer to lock it in that location. If you choose not to lock it in that location, Adapt It will only continue using that location for the current work session.
You need to be aware that if you create a custom work folder and then change back to the default work folder, none of the work done in the custom folder transfers to the default folder. The same is true in the other direction. You as the administrator are responsible to make those file transfers if they are needed. For this reason, the Adapt It team recommends that custom work folders are used rarely and if you choose to do so, you use them consistently instead of the default folders.
* Prepare the Paratext/Bibledit projects. You as Administrator should prepare the Paratext/Bibledit projects BEFORE setting up Adapt It collaboration. You should make sure that Paratext or Bibledit has at least TWO projects :
1. A project that contains the source language texts from which Adapt It will obtain its source texts for adaptation work. Preferably this Paratext/Bibledit project should contain all the available source texts that will be used in collaboration.
2. You also should make sure that Paratext or Bibledit has a different project created which will receive the adapted translation drafts produced by Adapt It.
If your user will be preparing free translations, you should also create a third project in Paratext/Bibledit to receive free translations. The books you create in the Paratext/Bibledit projects for receiving the target text and free translations can be empty but they should be created with (empty) chapter and verse numbers. Ensure that the (empty) books created correspond to the books that exist in the source language project.
* Setup Paratext/Bibledit Collaboration. You as Administrator should setup collaboration using the "Setup or Remove Collaboration..." menu item on the Adapt It Administrator menu. Using that Adapt It dialog, designate the Paratext/Bibledit projects that are to be used for a given Adapt It project. You can set configure different collaboration settings for different Adapt It projects. This ensures that the user will not have to do any setup, but can simply start working by selecting the Adapt It project to enter, choosing whether to turn collaboration on or off, and if collaboration is on, choosing the book and chapter to work on. After configuring Adapt It projects for collaboration, you should ensure that things are working correctly by doing what the user would do: select an Adapt It project from the opening page of the Start Working wizard, choosing to turn collaboration on (or off) for that project, and if collaboration is turned on, selecting a scripture book and a chapter from the "Get Source Text from Paratext/Bibledit Project dialog". If you get any errors, see the Trouble Shooting topic.
* Setup a user workflow profile. You as Administrator should carefully consider the skill and experience of the user, and determine if one of Adapt It's pre-configured user workflow profiles would be appropriate for a given user. You can establish a user profile using the Administrator menu's "User Workflow Profiles..." menu item. The Novice user profile hides most menu items and options that are not absolutely necessary for basic adaptation work. The Experienced and Skilled profiles enable more menu items and interface options. You can also customize any of the profiles or design your own profile using the Custom user profile. If you decide to use a profile, you should practice using Adapt It yourself with that profile in force, or at least closely watch the user working with that user profile in effect, to make sure that the options that remain visible are suitable for the skills and the work expected of that user. You don't want to hide options that a user really will need to do his job.
* Assign Locations for Inputs and Outputs. During collaboration with Paratext or Bibledit, Adapt It automatically limits the locations for source text inputs and target text outputs to the Paratext or Bibledit project being used in collaboration. But, Adapt It is able to do other kinds of inputs and exports. You as Administrator, should decide whether your user should be "protected" from the possibility of getting inputs from the wrong place, and exporting outputs to the wrong place. Without such protection files can get lost or misplaced. We suggest that you select all of the "Protect from Navigation" check boxes in the "Assign Locations for Inputs and Outputs" dialog. When the "Protect from Navigation" check box is ticked, Adapt It will automatically name and locate files for that particular type of input or output, placing the files within Adapt It's special folders.
* Check the settings in Adapt It's Preferences dialog. The Preferences dialog is accessible from the Edit menu with a document loaded for collaboration. You as Administrator should ensure that Adapt It is using the correct Fonts, Punctuation, and any Case equivalences for the languages involved in the collaboration work. Use the tabs in the Preferences dialog to make any needed changes.
Once you have done the necessary preparations as described in the "Preparations for Collaboration Work" section above, you should provide some supervised training in the use of Adapt It. Your training should include the following:
* Supervised "hands-on" adaptation work with the actual texts of the collaboration project. There is a document supplied with Adapt It installations called "Adapt It Tutorial.doc". Chapter 1 of that Tutorial contains information that is focused on situations where Adapt It is set up to work with texts apart from collaboration scenarios. It covers information that you as administrator might find helpful, but the user will not need to understand to work in collaboration with Paratext or Bibledit. However, chapter 2 of the Adapt It Tutorial.doc is called "Working on a document", and contains good information and exercises. You will want to adapt the information and procedures demonstrated there to your actual collaboration texts. Hence, you should help the user practice using actual texts in the collaboration project until s/he feels comfortable working with Adapt It. The knowledge and adaptation skills that treated in the tutorial and that are important for the user to develop are:
1. Understanding the parts of Adapt It's main window (menus,
toolbar, modebar, layout of strips, piles).
2. Positioning the
phrase box, typing text into it, pressing Enter to advance it.
3.
Merging source words to make a source phrase.
4. Unmerging a
source phrase.
5. Accepting a default adaptation without
changes.
6. Retranslating a section of source text; removing or
editing a retranslation.
7. Inserting an extra word or phrase;
removing inserted words or phrases.
8. Reading your translation
without the source text being shown.
9. Single-step mode versus
Automatic mode.
10. When there are multiple translations - the
Choose Translation dialog.
11. Leaving a source word
untranslated - three kinds of "nothing".
There is also a more comprehensive "Adapt It Reference.doc" document which you may find helpful.
* Getting texts by "Chapter Only" is the default method of exchanging texts with Paratext or Bibledit. You as administrator can select to "Get Chapter Only" or "Get Whole Book" within your "Setup or Remove Collaboration" dialog accessible from the Administrator menu. However, we recommend that you leave the default set as "Get Chapter Only". Single chapter chunks load and save more quickly than whole books such as the Gospels and Acts. Since Adapt It organizes everything and automatically does all transfers between Adapt It and Paratext or Bibledit, there is no logistical problem for the user to work chapter by chapter. Even when working chapter by chapter, Adapt It automatically transfers the chapter's translation work back into the whole books when Adapt It saves the translation work. In any case, you should not change between collaborating by Chapter Only and Whole Book for a given book. If adapting chapter-by-chapter, the user should continue working chapter-by-chapter until the whole book is finished.
* Reporting Problems and Giving Feedback. Adapt It is provided free of charge under an open source license. The developers are quick to respond to email reports of problems and requests. They depend on the reports of any problems as well as feedback from field users to improve Adapt It. Before reporting problems to the developers, please have a look at the Trouble Shooting topic below. If that does not help you resolve the problem, feel free to contact the developers either via email or via the "Report a Problem..." selection in Adapt It's help menu (see below).
Adapt It version 6 now has an easy to use email reporting feature - located on the Adapt It Help menu. Just click on the Help menu item labeled "Report a Problem..." and Adapt It will display the following dialog - with much of the information already filled in:
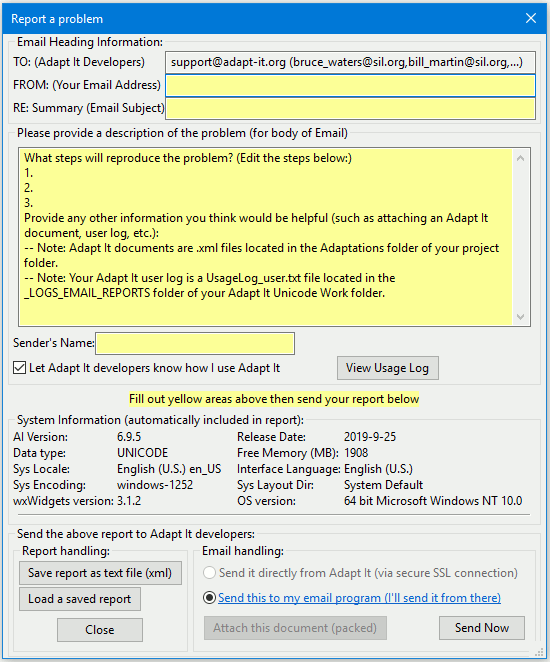
Just fill in your email address, the email subject/summary, your name and a brief description of the steps to reproduce the problem, using the text in the edit box as a guide for your comments. If a document is open that illustrates the problem, just click on the "Attach the document (packed)" button to include a copy of the packed document along with the report. If you have access to the Internet, you can click on the "Send Now" button to send your report. Adapt It also saves a copy of your report in the _LOGS_EMAIL_REPORTS folder located in its "Adapt It (Unicode) Work" folder. The usage log is automatically included in the email report (unless you untick the check box). It would likely provide information and possible error messages that would help us understand the cause of any problem. When the "Send this to my email program (I'll send it from there)" button is selected, Adapt It sends the report directly to the user's default email program where the user can edit the report further (if needed), and send it to the Adapt It developers from the user's email program.
There is also a Help menu item called "Give Feedback...". The form looks similar to the form for reporting a problem, but is provided to make giving feedback easier to do via email:
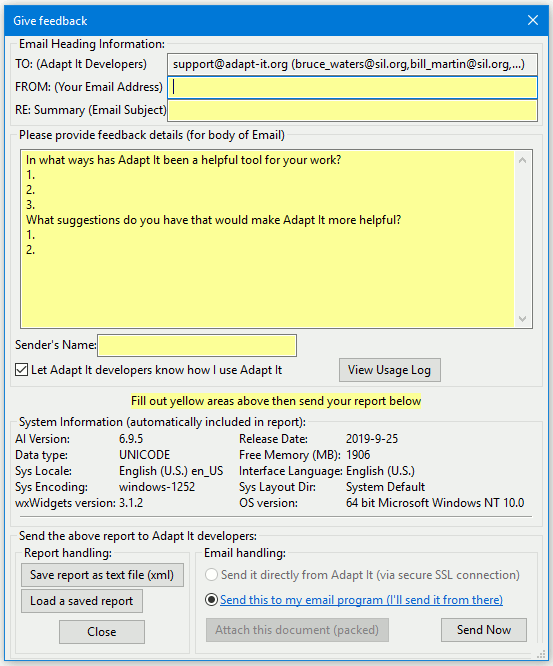
Just fill in your email address, the email subject/summary, your name and your feedback in the edit box provided. Use the text in the box as a guide.
Note: Adapt It sends all such emails to the developers using secured SSL encryption directly from the Adapt It program, so email communications are done safely. The user's computer does not have to have an email client installed to send these reports.
This section describes how to set up desktop icons or "launchers" to make it easy for users to start up Adapt It for a given work session. It also describes how you can configure a launcher with a command-line switch/option that forces Adapt It to run with in a certain mode for the work session. First, we provide a description of the command-line options and how they work. Afterwards we provide information on how to setup desktop launchers for typical Windows and Linux (including Balsa) systems.
-xo the -xo switch can be used to force Adapt It to accommodate the unusual screen density (DPI), font and bitmap handling of the One Laptop Per Child (OLPC) XO computer. This switch forces Adapt It to use double-sized bitmap images in its tool bar, and a double line of controls on its mode bar. This arrangement helps to make the tool bar buttons more accessible and the mode bar items more likely to fit within the screen on an XO computer.
-wf the -wf switch/option can be used to
force Adapt It to always use a specified folder path for its work
folder. The -wf switch must be followed by the absolute folder path
to be used for Adapt It's work folder. Ordinarily Adapt It's work
folder would be located at:
C:\Users\<userName>\Documents\Adapt It Unicode Work\
on recent versions of Windows systems (Windows Vista, Windows 7 and
Windows 8)
/home/<userName>/Adapt It
Unicode Work/ on most distributions of Linux systems
/Users/<userName>/Adapt It Unicode Work/ on
Macintosh OS X systems
The -wf switch could be used to force
Adapt It to place its project folders in a non-standard location such
as in a /data/ folder of an external thumb drive. For example, on
Windows the work folder location might be at:
E:\data\
and the command-line Target for this in a
launcher would be:
"C:\Program Files\Adapt
It WX Unicode\Adapt_It_Unicode.exe" -wf E:\data\
Note:
Command-line switches/options that include paths or file names
containing spaces must be enclosed in double quote marks.
-frm the -frm switch can be used to force Adapt It to operate only in reviewing mode. This switch should only be used in special circumstances in which you want the user to produce a very literal gloss or adaptation for the source text. In Reviewing mode Adapt It does not supply adaptations automatically nor jump to the next available hole in the translation. In this mode Adapt It's knowledge base still stores the meanings that are being typed in by the user. But it does not automatically do any lookups or offer any translation equivalents as the user works. This mode therefore forces the user to type in a gloss or adaptation for every source text word or phrase. This switch/mode is being used in places where the administrator feels that a translator does not yet have enough training to be able to interpret potential translational renderings that Adapt It might enter automatically from its knowledge base.
[Other command-line switches may be added in a future version of Adapt It]
1. Install Adapt It version 6.2.1 or newer.
2.
Open Windows Explorer and navigate to the Adapt It installation
folder, and click on the Adapt It program executable file, normally
located at c:\Program Files\Adapt It WX
Unicode\Adapt_It_Unicode.exe for the Unicode version, or
c:\Program Files\Adapt It WX\Adapt_It.exe for the
Regular (ANSI) version. (On a 64bit Windows machine, the installation
folder is within the Program Files (x86) folder.)
3.
Right-click on the Adapt_It_Unicode.exe (or Adapt_It.exe) file and
select "Send To" > "Desktop
(create shortcut)".
4. Close or minimize Windows
Explorer and any other programs so you can see the shortcut that was
created in the previous step. Right-click on that
shortcut and select "Rename". Then enter a
brief name for this launcher, possibly something like "Peter's
Adapt It work". The launcher name should be short but worded
so that the user(s) can distinguish this launcher from any others you
plan to create for other work scenarios.
5. Right-click
on the desktop shortcut and select "Properties
". You should see a Shortcut properties dialog that looks
something like this:
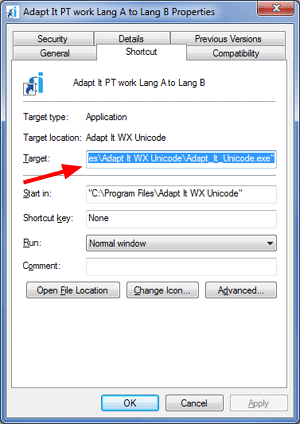
6. If a command-line switch is desired for this launcher, it would
be added at the end of the existing text that is in the "Target"
edit box (with an intervening space). Press the right arrow key or
click in the box to remove the highlight, but keep the existing text
there in the edit box. If you want to add a command-line switch, add
a space at the end of the existing text path after the last
quote mark, and then type the command-line option,
for example:
-wf
e:\data
7. Click on
OK to save and close the Shortcut Properties dialog. Your desktop
launcher is now ready to use.
8. Double-click the newly
created desktop shortcut icon labeled "Peter's Adapt
It work" to launch Adapt It. Adapt It will start running and if
a command-line switch was used it will be forced to run in the
desired mode.
9. To create other launchers for different Adapt
It work scenarios, follow steps 2 through 8 above, adjusting the name
of the desktop launcher in step 4, and any command-line switch/option
used in step 6 according to the work scenario you want the launcher
to run.
1. Install Adapt It version 6.2.1 or newer for your Linux
distribution.
2. If you are using the classic Gnome
interface, click on Applications > Office,
and right-click on the Adapt It
menu item, and select "Add this launcher to desktop".
3.
If you are using the newer Gnome Unity interface, click on the Ubuntu
Dash home icon to open the panel, and type "adaptit" into
the search bar at the top. When the Adapt It icon appears click on it
and drag it to an empty area of your desktop.
4. Close or
minimize any other programs so you can see the desktop shortcut that
was created in the previous step. Right-click on
that shortcut and select "Rename...". Then
enter a brief name for this launcher, possibly something like
"Peter's Adapt It work". The launcher name should be
short but worded so that the user(s) can distinguish this launcher
from any others you plan to create for other work scenarios.
5.
Right-click on the desktop shortcut and select
"Properties ". You should see an Adapt It
Properties dialog that looks something like this:
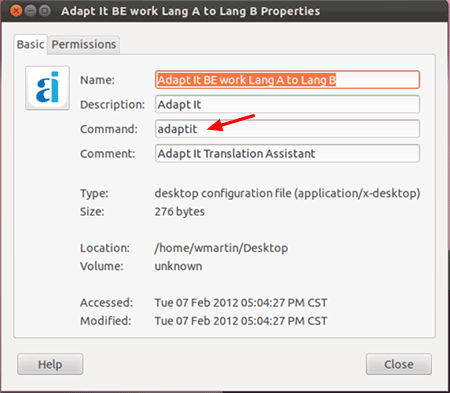
1. Log on to the Advisor Balsa account and install Adapt
It version 6.5.3 or newer for your Lucid distribution.
2. Right-click on the desktop and choose
"Create Launcher...". The Balsa system
displays the "Create Launcher" dialog which looks like
this:
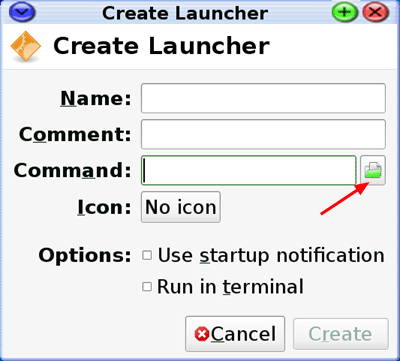
3. In the "Name:" edit box, enter a
brief name for this launcher, possibly something like "Peter's
Adapt It work". The launcher name should be short but worded so
that the user(s) can distinguish this launcher from any others you
plan to create for other work scenarios.
4. The "Command:"
edit box is where you construct the command-line to launch
Adapt It along any desired command-line switch/option. Click on the
folder icon at the right end of the "Command:" edit box. A
"Select an Application" dialog comes up that lists the
available applications. Scroll down a little to the adaptit
item, select it, and click the "Open" button. The system
enters /usr/bin/adaptit into the "Command:"
edit box.
5. If a command-line switch is desired for this
launcher, it would be added to the end of the existing text that is
in the "Command" edit box (with an
intervening space). Press the right arrow key or click in the box to
remove the highlight, but keep the existing text there in the edit
box. If you want to add a command-line switch, add a space at the end
of the existing text path after the last quote mark,
and then type the command-line option, for example:
-xo
6.
Click on the "No icon" button, and select the Adapt It icon
from the list of application icons, and click OK. The Adapt It icon
appears in place of the button. You can also enter a comment into the
"Comment:" edit box if you want to. It will appear as a
tool tip when the mouse hovers over the launcher.
7. Tick the
"Use startup notification" check box.
8. Click on the
Create button to create the launcher. Your desktop launcher has
now been created and is located on the Advisor's Desktop. But there
is more work to do to install this launcher on the Balsa User's
desktop along with the default launchers already located there.
9.
If you can see the newly created launcher on the Advisor's desktop go
to the next step. If you cannot see the newly created launcher on the
Advisor's Desktop, you may need to temporarily reduce the size of
your desktop icons. Right-click on the Desktop and select "Desktop
Settings..." and click on the "Icon" tab in the
Desktop dialog. Under "Appearance" reduce the icon size
value there to 64 or smaller, and click the "Close" button.
Now you should be able to see the launcher you created on the
Advisor's Desktop.
10. Right-click on the desktop launcher you
created, and select Open
with "gedit".
Change the Categories= line so that it reads: Categories=GTK;Office;
making sure that the two words following
the = sign end with a semi-colon character ;
11.
Click on the File >
Save and then File
> Close to exit from
the gedit editor.
12. Log
out of the Advisor account and log on to the Balsa User account.
13.
In the Balsa User account click on the Documents icon to start up the
File Manager.
14. Navigate into the File System and find the
/home/advisor/Desktop
folder. In that folder you should see
the desktop launcher you created earlier while logged into the
Advisor account.
15. Click on the desktop launcher to select it
and do Edit >
Copy.
16. Navigate
back to the /home/balsa/.local/share/applications
folder and do Edit
> Paste.
17. Log
out of the Balsa User account and log on to the Balsa
Advisor account.
18.
Double-click on the "Edit
Tabbed Desktop"
icon, and select the "Balsa
User" item in the
popup dialog, and click OK. Enter the Advisor password admin123456
and OK. This action starts up the "Main
Menu" editor.
19.
In the Main Menu editor navigate to the Applications
> All Apps > Office folder.
You should see there the launcher that you pasted there in step 16
above.
20. Click on the name of the launcher to select it (make
sure the check box has a tick in the box).
21. Scroll the left
hand list up so you can see the "Work" menu under
Applications. Now back in the Items: list drag
the selected launcher across
to the "Work" menu dropping
it directly onto the "Work" menu item.
You should ensure that the background of the "Work" shows a
dotted box before you drop the launcher on that item. Select the
"Work" item to ensure that your launcher is now in that
menu list (you may need to scroll down to see it). If it is not
there, try the drag and drop action again until you see your
launcher appear in the list of items under the "Work"
menu. Note: The ordering of items in the "Work" menu list
is the order the launchers will appear in the User's Desktop. On
small computer screens, not all of the launchers listed there may be
seen when viewing the User's Desktop. If that is the case you can
return to the Main Menu editor and adjust the order of the icons so
that those the need to be seen are up higher in the list.
22.
You can now Log out
of the Advisor account and log on to the Balsa User account.
You should now see your launcher on the Balsa User's Desktop.
23.
Double-click the newly created desktop shortcut icon labeled "Peter's
Adapt It work" to launch Adapt It. Adapt It will start running
and automatically and if a command-line switch was added, will use
whatever mode that may have been forced by a command-line
switch/option.
24. To create other launchers for different Adapt
It work scenarios, follow the above steps for each new launcher you
create, adjusting the specific properties of the desktop
launcher and any command-line switch you want the launcher to force
Adapt It to use when it runs.
Note: Many fixes have been made to the Paratext/Bibledit collaboration feature in recent versions of Adapt It. Hence, you should make sure that you are using the newest version of Adapt It that is available from the adapt-it.org website. You can check the version of Adapt It by selecting "About Adapt It..." from Adapt It's Help menu.
Important: We have found that collaboration problems sometimes result from wrong project sharing roles assigned for the Paratext Target text project that Adapt It is trying to use for a collaboration project involving Adapt It and Paratext. It is important that the Paratext Target text project that you create to receive Adapt It's adaptation text, be assigned the "Translator" (or "Administrator") role on the user's computer that is doing the collaboration work between Adapt It and Paratext. If the Target text project in Paratext on the user's computer is not given the Translator or Administrator role, Adapt It will not be able to automatically save the Target text that is being created during the adaptation process over to the Paratext file storage location.
Adapt It relies on a separate utility program that it uses to exchange data between Adapt It and Paratext. Paratext installs a utility program called rdwrtp7.exe or rdwrtp8.exe that Adapt It attempts to execute when collaborating with Paratext. The newest version of Paratext 9 also continues to install the utility program named rdwrtp8.exe even though Paratext 9 is being used. Ordinarily you need not worry about these utility programs. However, we have not been able to test these utility programs on all possible computer system configurations and architectures. So, if you get errors when attempting to setup collaboration between Adapt It and Paratext, it is likely that the problem could be a compatibility problem that we have not yet had to account for between your computer system and the version of the utility program installed by Adapt It. (There is an as yet unverified possibility that Kaspersky (or possibly another antivirus) program prevents the successful transfer of adaptations to Paratext. Try "killing" the running Kaspersky process in your current work session and then check if collaboration then works correctly.)
When you have upgraded to the newer version 8, you should make sure that all Paratext projects get migrated from the old Paratext 7 installation over to the new Paratext 8 installation. You also must upgrade your version of Adapt It to at least version 6.8.2. Older versions of Adapt It (especially those before version 6.8.0) will NOT collaborate with version 8 of Paratext. After you (as administrator) have upgraded a user's Paratext from version 7 to version 8, you should also upgrade the user's Adapt It version to the more recent version available at adapt-it.org. Then you should also ensure that Adapt It can still collaborate with the newer version of Paratext. If you encounter a problem with Adapt It - Paratext collaboration after updating your Paratext installation, please let us know so we can provide an Adapt It update that will correct the problem. Such problems are not very likely to happen between Adapt It and Paratext, but if they do happen it is most likely they would happen after a fairly major update of either Paratext or Adapt It. Please write down the text of any error messages that appear, and include those with any problem reports you send us. If you have Internet access and use email you can try submitting a report using the "Report a Problem..." selection from Adapt It's Help menu, or send us a report via regular email - our email addresses are shown on Adapt It's "About Adapt It..." selection on the Help menu.
Note: Most problems in collaboration between Adapt It and Bibledit can be solved by ensuring that your version of Adapt It is at least version 6.6.4 and your version of Bibledit is at least 4.3. See the Step 1 of the Bibledit setup process. If you have done all the setup steps for Bibledit, but are still having problems, the information below may be of some help.
Adapt It relies on a separate utility program that it uses to exchange data between Adapt It and Bibledit. There are different utility programs for different computer architectures (32-bit, 64-bit, etc.) and Ubuntu distributions. Bibledit version 4.3 and newer installs an executable file called bibledit-rdwrt for collaboration with Bibledit on Linux systems. Ordinarily you need not worry about this utility program. However, we have not been able to test these utility programs on all possible computer system configurations, and especially on different Linux distributions/architectures. So, if you get errors when attempting to setup collaboration between Adapt It and Bibledit, it is likely that the problem could be a compatibility problem that we have not yet had to account for between your computer system and the version of the utility program installed by Adapt It. If you still find that collaboration with Bibledit is failing, please inform the Adapt It developers about the problem, so we can find a solution and possibly make a corrected version available in a future update. Please write down the text of any error messages that appear, and include that information with any problem reports you send us. If you have Internet access you can try submitting a report directly from Adapt It (see the "Report a Problem..." selection from Adapt It's Help menu), or send us a report via regular email - our email addresses are shown on Adapt It's "About Adapt It..." selection on the Help menu. Please include what distribution of Ubuntu you are running and whether it is a 32-bit (i386) or 64-bit (amd64) system, plus any other details you think might help us to provide a fix. Detailed information about your system should be available by accessing your System Info (via System >Administration > System Monitor, or System Settings > System Info on Unity).